- Get link
- X
- Other Apps
After a cold end of April, May has arrived! I'm ready to get outside in our garden again, and this pillow's bright colors and prints are just what I need (And how cute is that little ladybug?) I like this design because it combines three of my favorite needlework skills: fabric piecing, felt applique, and embroidery. Here's a list of the materials I used:
- Cotton fabrics: Green print -- one 3 1/2" x 12" piece and one 2 1/2" x 9 1/2" piece; black/white chevron, two 2 1/2 x 9 1/2" pieces; red polka dot, red/white floral, and white -- one 2 1/2 x 9 1/2" piece each
- National Nonwovens Woolfelt: Small pieces Bright Red, Magical Forest, Chartreuse, and Black
- Embroidery Floss: black, red, dark green , bright green, and light green
- Six 1/4"-diameter black buttons
- Polyester fiberfill
The first step is sewing the strips of fabric together to make the pillow front. Follow the diagram above and use 1/4" seam allowance to sew the horizontal strips together. When all six strips are pieced together, sew the remaining wide green strip to the side as shown.
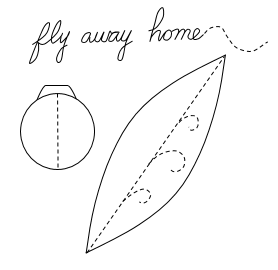
The next step is embroidering the "fly away home" script onto the white strip. Print out the pattern at the bottom of this post to the desired size and use a fabric marking pen to trace the script on the white fabric. Use three strands of red floss and backstitch to embroider the script onto the fabric.
For the appliques, use the patterns at the bottom of the page to cut two leaves (mine are about 4 1/2" long) from the Magical Forest felt, one leaf from Chartreuse, one ladybug head from Black, and one ladybug body from Bright Red. Embroider the curved veins on the leaves with backstitch. Sew the buttons onto the ladybug body, and whipstitch the head to the body with black floss. Arrange the appliques on the pillow front, stuff them lightly with fiberfill, and pin them in place. Sew the pieces in place with coordinating floss and backstitch.
When the appliques are finished, add center veins on the leaves and a center line on the ladybug's body. Stitch right through the fiberfill and the pillow fabric to create extra dimension.
Now you can use your embroidery skills to embellish the design anyway you like. I added black backstitch antennae to the ladybug and whipstitches around the leaves to gives them extra texture. For the twisty vines, I used different shades of green floss and a combination of backstitch and long-and-short stitch.
To complete the pillow, cut a piece of backing fabric (I used solid green) the same size as the pillow front. Sew the two pieces together, right sides facing, leaving an opening for turning. Clip the corners, turn the pillow to the right side, and fill it with a pillow form or fiberfill. Sew the opening closed and your cheery ladybug pillow is complete. Happy stitching!
 |
| Embroidery and Applique Patterns |
(This design was published on my previous blog, KBB Crafts & Stitches.)
- Get link
- X
- Other Apps


